As course files grow, count them by file type.
Course folder 课程文件夹
L01.PDF      L02.pdf
README       .env
notes.txt    data.csv
lab1.py      diagram.PNG
Target report 预期报告
(none): 2
csv: 1
pdf: 2
png: 1
py: 1
txt: 1
PDF 与 pdf 合并统计;原文件名保持不变。
第 8 讲 · 讲义
课件的每一页,配上讲这一页时说的话。幻灯片是网页原生渲染的,文字可以选中、可以搜索,也可以直接打印。

本讲先解释 LLM 怎样生成回答,前半用已有 Python 代码练习读代码、局部求助、诊断报错和验证;后半认识 Linux,并使用几个独立的小例子练习终端。学生自己整合、运行和核对代码。

As course files grow, count them by file type.
L01.PDF L02.pdf README .env notes.txt data.csv lab1.py diagram.PNG
(none): 2 csv: 1 pdf: 2 png: 1 py: 1 txt: 1
PDF 与 pdf 合并统计;原文件名保持不变。
几周课程下来,文件夹里有课件、代码、笔记和数据。现在想知道各类文件分别有多少个:左侧列出八个样例文件名,右侧是我们希望得到的报告。这个工具只统计文件名,不需要打开 PDF、图片或代码内容。
先明确规则:L01.PDF 和 L02.pdf 都属于 pdf;README 和 .env 没有有效后缀,归入 (none)。原来的文件名应保持不变。右侧是符合这些规则的目标报告,也已由完整参考程序实跑核对。接下来先认识提供的项目,再检查初版函数能否满足这些要求。
We will read and review the first version.
先下载右侧 ZIP 并解压,打开 candidates/first.py。它只有初版统计函数,是我们接下来审查的对象。左侧高亮这一行,其他文件现在只需知道用途:inventory.py 是完整参考,check_inventory.py 是独立检查,sample-files/ 保存样例。点击左侧 inventory.py 也可以单独下载参考代码。
暂时不展开目录读取和 main() 的细节。先读初版函数,下一页用三个文件名比较它的真实输出与预期,再讨论怎样审查和向聊天 AI 寻求局部帮助。完整参考可用 python3 check_inventory.py 检查,用 python3 inventory.py sample-files 运行。课堂材料不增加实验提交。
The initial function counts PDF and pdf separately.
Input: ["L01.PDF", "L02.pdf", "README"]
{'PDF': 1,
 'pdf': 1,
'(none)': 1}{'pdf': 2, '(none)': 1}Review code
Find the mismatch
Ask AI locally
Explain or suggest a fragment
Run checks
Verify the change yourself
先审查实际行为,再引入 AI 局部辅助;建议仍需自己验证。
对同样的三个名字,初版函数实际返回左侧字典,把 PDF 和 pdf 当成不同键。根据刚才确定的合并规则,我们期望右侧结果。初版来自保留的 candidates/first.py;左侧输出和完整参考的右侧结果都已有 Python 实际运行记录。最初请求未明确大小写,现在按明确后的规则来审查,不能把这说成模型违反了原先没有提出的要求。
这就是今天的起点:程序能运行,还需要审查它是否符合任务。我们先读懂代码和已有行为,再用聊天 AI 获得解释、报错分析或局部修改建议;修改由自己整合,结果由自己运行和核对。后面会用 DeepSeek 的真实对话逐项练习。
审查时除了核对返回的计数,也要留意输入有没有被意外修改。后面会用一个列表例子说明。
Two parts: AI + debugging, then Linux.
本讲分为两部分。前半先理解大语言模型的能力与局限,再用聊天进行局部求助,并用测试和调试器自己验证。后半先看 Linux 视频,认识历史、内核、发行版和 shell,再练习几个常用终端操作。
目录统计项目只用于 AI 辅助与代码审查的示例;Linux 部分使用简单、独立的 hello.py 和文件操作。
Large Language Model(LLM,大语言模型)

训练调整参数;提问提供上下文。
大语言模型是一种含大量可学习数值的神经网络。插画中的旋钮代表这些参数:训练会用大量文字和代码样例练习预测,并根据误差调整参数,逐渐学到语言、代码结构与上下文之间的关联。指令与回答示例、反馈等训练,进一步改善模型遵循请求和回答的方式。
使用模型时,我们提供问题及相关上下文,模型利用已学到的参数生成回答。普通聊天中增加背景信息,改变的是本次输入;这与训练时调整参数不同。模型并非由开发者逐题写好答案。
Read the context → choose a token → append → repeat.
新片段接回完整上下文,再生成下一片段。
模型每次生成一个 token,也就是一个文本片段。图中先用 The sky is 作为上下文,示意 blue、clear、dark 等可能的续接。选出 blue 后,把它接回原上下文;下一次输入就是 The sky is blue,再预测接下来的片段。点击“下一步”可以观察这一过程。
token 可能是词、词的一部分或标点,不等于一个汉字或完整单词。图中的分块和候选条只作示意;具体分块由分词器决定,条长不代表某个模型的实测概率。[end] 示意用于结束回答的特殊标记,具体符号由模型决定。生成会参考完整的可见上下文,而非只看最后一个词;选择方式也不一定总取概率最高项。
Code is structured text; generating it does not execute it.
模型生成代码文本;解释器执行,测试检查行为。
模型训练时接触到的文字、说明文档和代码,具有相关的结构:接口名与用途、错误与原因、请求与代码片段之间都有联系。因此,同一个模型可以生成概念解释、错误分析和局部代码。图中是三种回答形式的示意,并非某个产品的实际对话记录。
生成的代码仍然是一段文本。只有交给 Python 解释器执行,才会得到实际运行结果。下方展示表达式 "PDF".lower() 的例子,对应 print("PDF".lower()) 已在课程 Python 3.13 中实际运行,输出 pdf。模型给出代码,并不意味着它已经执行过代码、知道本机环境,或验证了任务的所有要求。
A plausible suggestion may use an unavailable method.
1  s = "hello"
2  print(s.reverse())
AttributeError: 'str' object has no attribute 'reverse'
先核对接口和任务,再采纳建议。
教材中的 s.reverse() 是一段用于审查接口的教学候选。字符串没有该方法,课程 Python 3.13 实际运行得到下方 AttributeError。这里只显示实际错误最后一行,完整记录保留。
LLM 能提供有用分析,也可能混淆对象接口、遗漏边界或缺少当前版本信息。不能用流畅程度代替证据,也不能把所有 AI 回答都说成错误。
Who edits files and runs the code?
本周局部求助,自己修改运行;不让 AI 代写整题。
LLM 负责生成输出,聊天应用负责组织对话和上下文。左图中,我们把相关代码和真实报错发给聊天助手,得到解释或局部建议;随后自己修改文件、运行代码并核对结果。
右图中,agent 程序把模型提出的工具请求交给文件、终端等工具执行,再把输出或报错送回模型,继续决定下一步。工具操作由程序调度,模型本身不会凭空直接接管电脑。学生仍要检查实际改动和运行证据。
本周采用 Level 1:允许聊天式解释、debug 与局部代码生成或修改,但不允许根据题目直接生成完整解,也不使用 coding agent 操作项目。Level 2 才开放完整实现和 agent 自动修改、运行与纠错。聊天窗口的外观不能决定使用的是哪一级能力。
Our examples use DeepSeek Chat.
Chat AI tools
 ChatGPT
 Claude
 DeepSeek
 豆包
 千问
 腾讯元宝
 Kimi
 智谱 GLM
 MiniMax
 小米 MiMo
常见的聊天 AI 工具包括 ChatGPT、Claude、DeepSeek、豆包、千问、腾讯元宝、Kimi、智谱 GLM、MiniMax 和小米 MiMo。本讲后续使用 DeepSeek Chat 作为具体例子。
在浏览器中打开 https://chat.deepseek.com/,在消息输入框中写下问题,再发送给助手。接下来通过具体代码与报错,练习怎样描述问题、读懂回答,并自己修改和运行代码。
Use chat at different points in your own work.

Understand
读懂代码
Trace state changes.
Add a fragment
生成局部代码
Keep one local change.
Diagnose
分析报错
Use the real traceback.
Review checks
审查检查遗漏
Find a missing case.
先明确卡在哪里,再决定请 AI 帮哪一部分。
四个具体用途:读懂当前代码、补一个局部片段、分析实际报错、检查测试遗漏。学生仍掌握任务、主体实现和运行。
后面先看循环与局部后缀修改,再看真实 IndexError。遇到不同困难时,可以先决定需要的是解释、片段、诊断还是检查建议。
Make the same problem reproducible.
It does not work.
Please fix it.
Python: 3.13
Input: "README"
Expected suffix: "(none)"
Actual: IndexError
Code: parts[1].lower()
Include the full traceback.
Ask: explain + local change.
让别人拿到材料后,可以复现同一个问题。
同一个局部问题,左边只要求修,右边列出版本、输入、预期、实际与相关代码,并要求附上完整回溯。请学生指出每项信息分别减少了什么猜测。
此处是请求示例,后面会真正运行并展示同一类型错误。不要用冗长背景替代相关信息;移除密码、令牌、他人资料及个人作业 1 代码。
Decide the expected behavior before asking.
names → suffix handling
      → count with a dict
→ print the report任务与预期自己决定,AI 建议再据此检查。
本页的“示例项目 ZIP”包含课堂目录工具、独立检查和样例文件;解压后先阅读 README。inventory.py 是合并大小写后的完整参考实现,candidates/first.py 保留修改前的核心函数,便于对照局部修改。这个项目用于课堂阅读和运行,不增加实验提交。先由学生确定任务预期:最后有效后缀、小写、特殊文件名和输入不变。
把循环、后缀处理、字典计数和打印分开。今天可向 AI 请求帮助的位置是一个局部片段;目录和命令行外壳仍由教师提供,L12 系统展开。
Ask about the part you do not understand.
Sent to AI 发出的材料
这段代码我有点没看懂,get 后面的 0 是干嘛的?能拿第一次循环简单说说吗?
counts = {}
for ext in ["pdf", "pdf", "txt"]:
    counts[ext] = counts.get(ext, 0) + 1
AI reply 回答节选
如果字典里没有 ext 这个键,就返回 0;如果有,就返回它对应的值。
0
{'pdf': 1}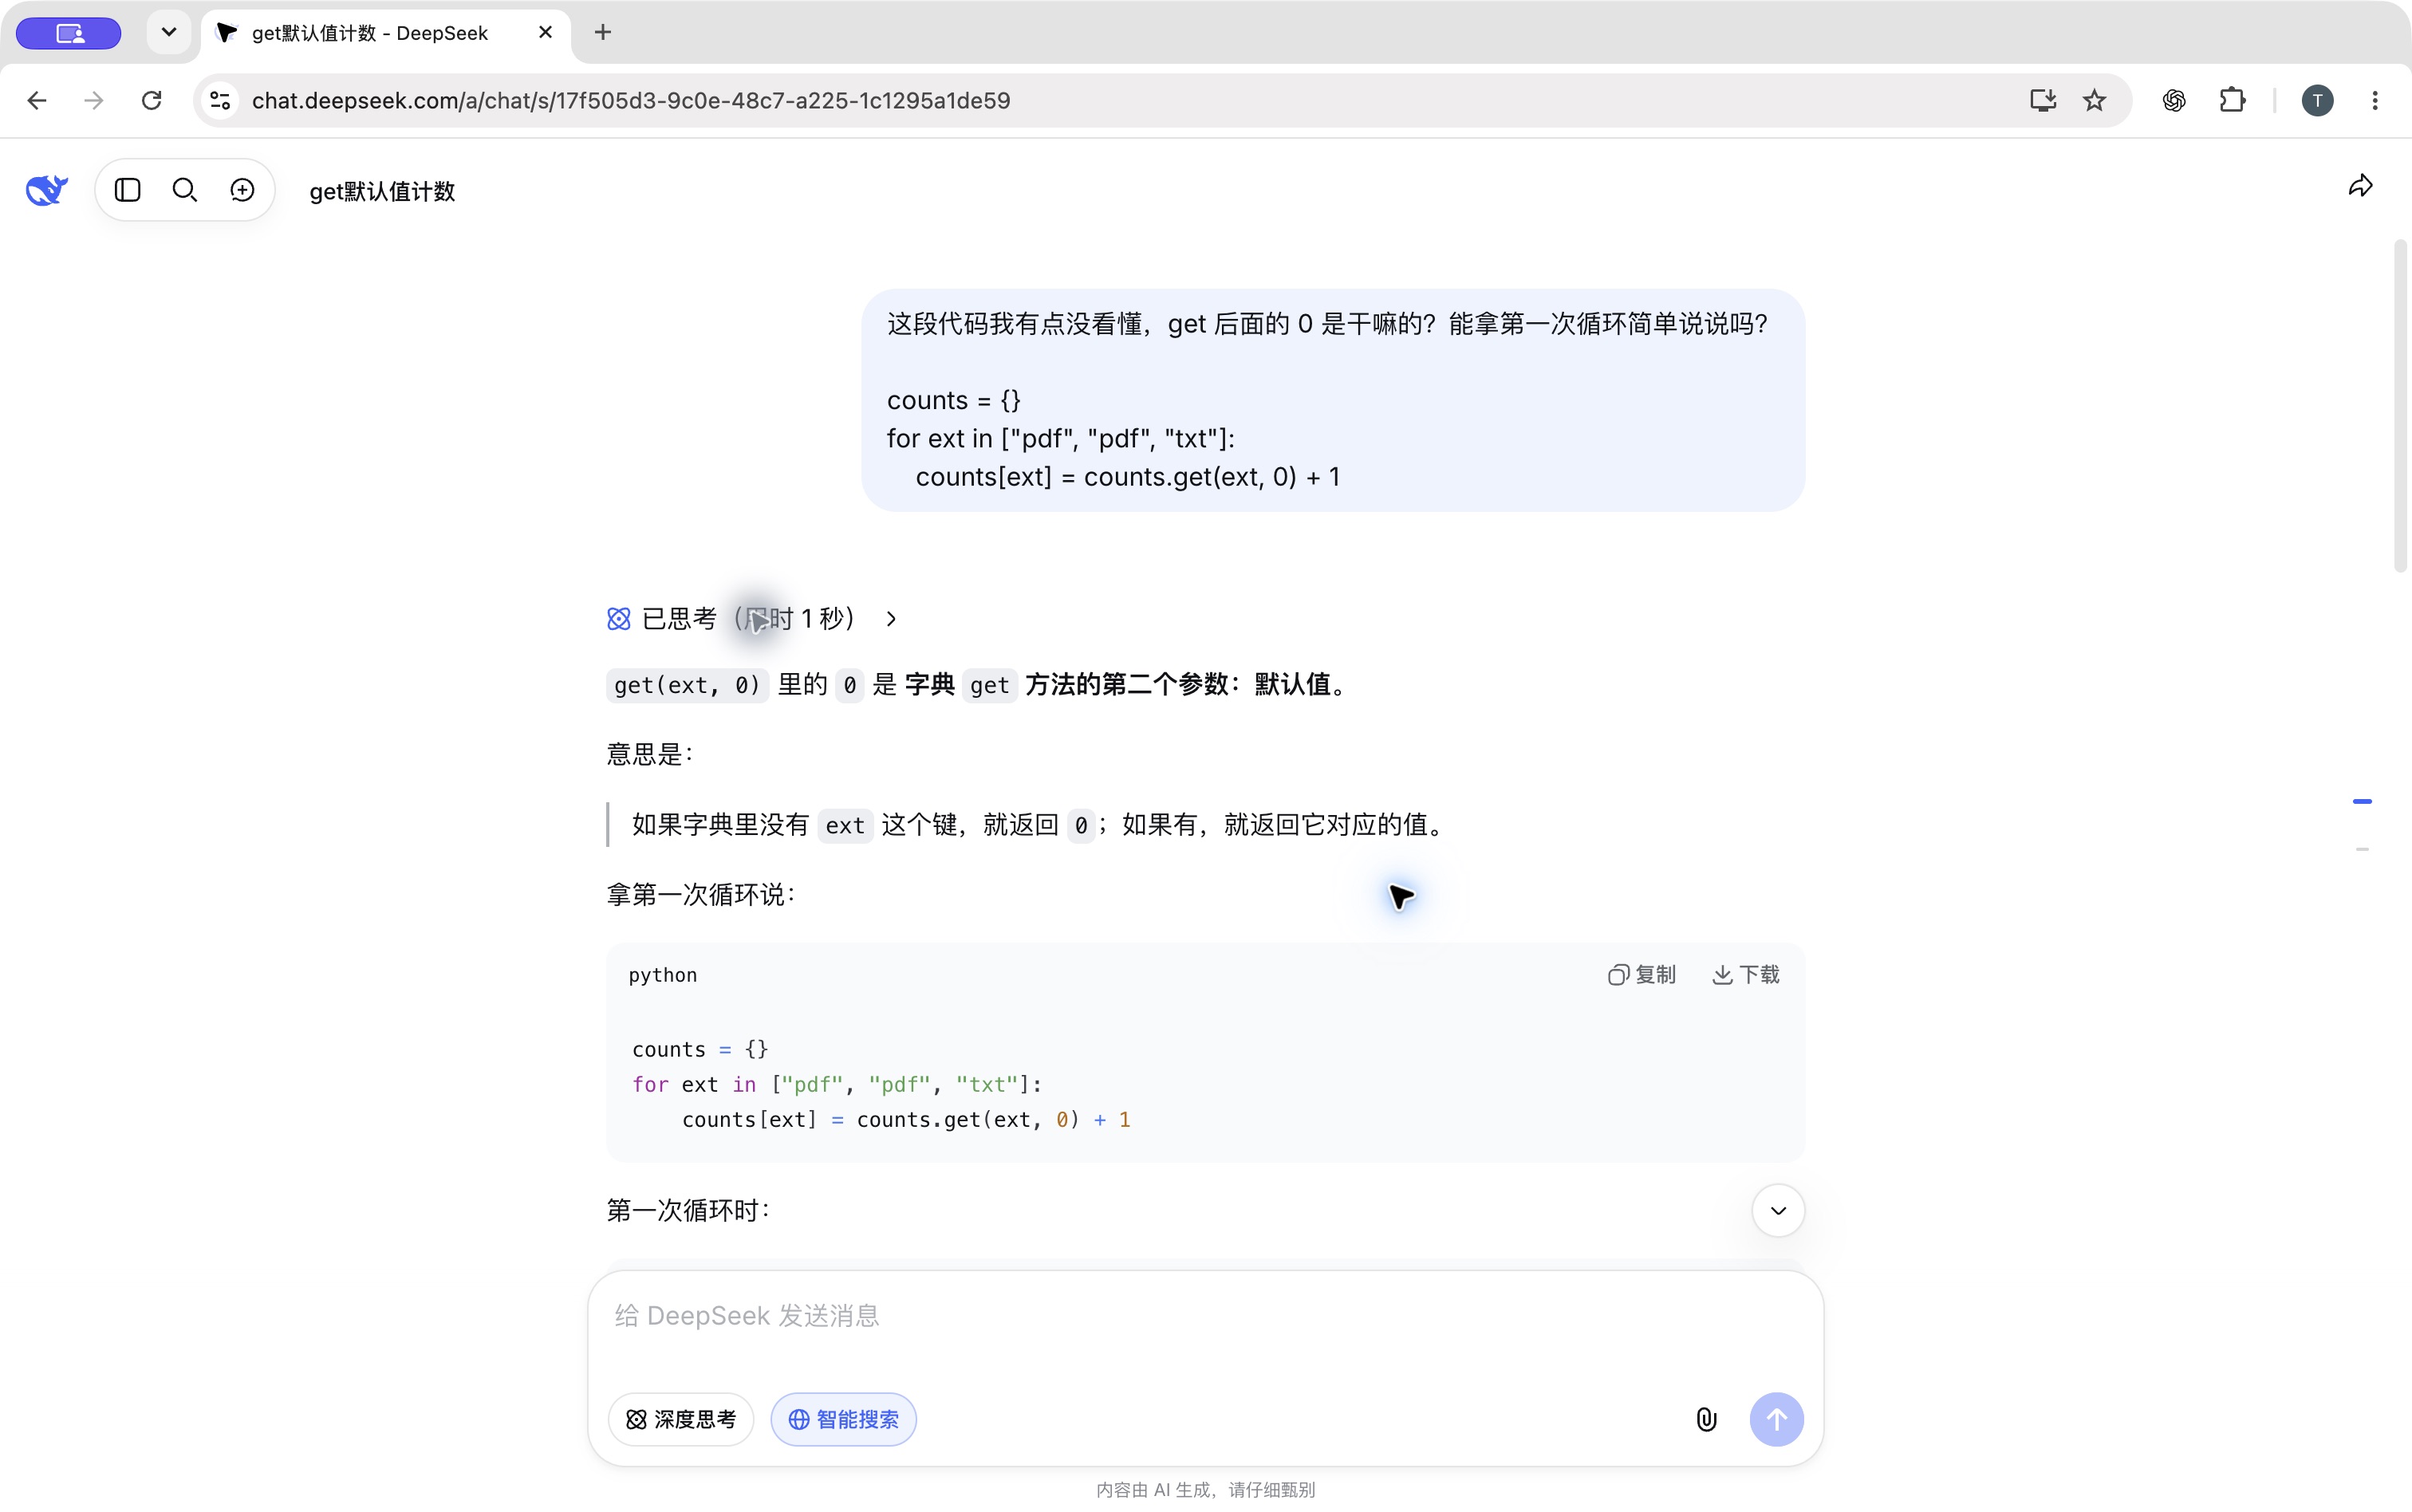
DeepSeek Chat
点击放大完整对话
问清楚一个具体点,再自己验证。
我们把正在阅读的循环贴到 DeepSeek,直接问“get 后面的 0 是干嘛的”。回答指出:字典里没有对应键时,get 返回默认值 0;已有这个键时,返回原来的计数。随后用自己的话追问第一轮是否得到 {"pdf": 1}。
右侧是实际回答的原文节选。自己再用空字典运行 counts.get("pdf", 0),得到 0;完成第一次更新后,counts 为 {"pdf": 1}。解释要能对应到当前代码的具体状态,遇到不清楚的地方可以继续追问。
Clarify the context, then choose one local change.
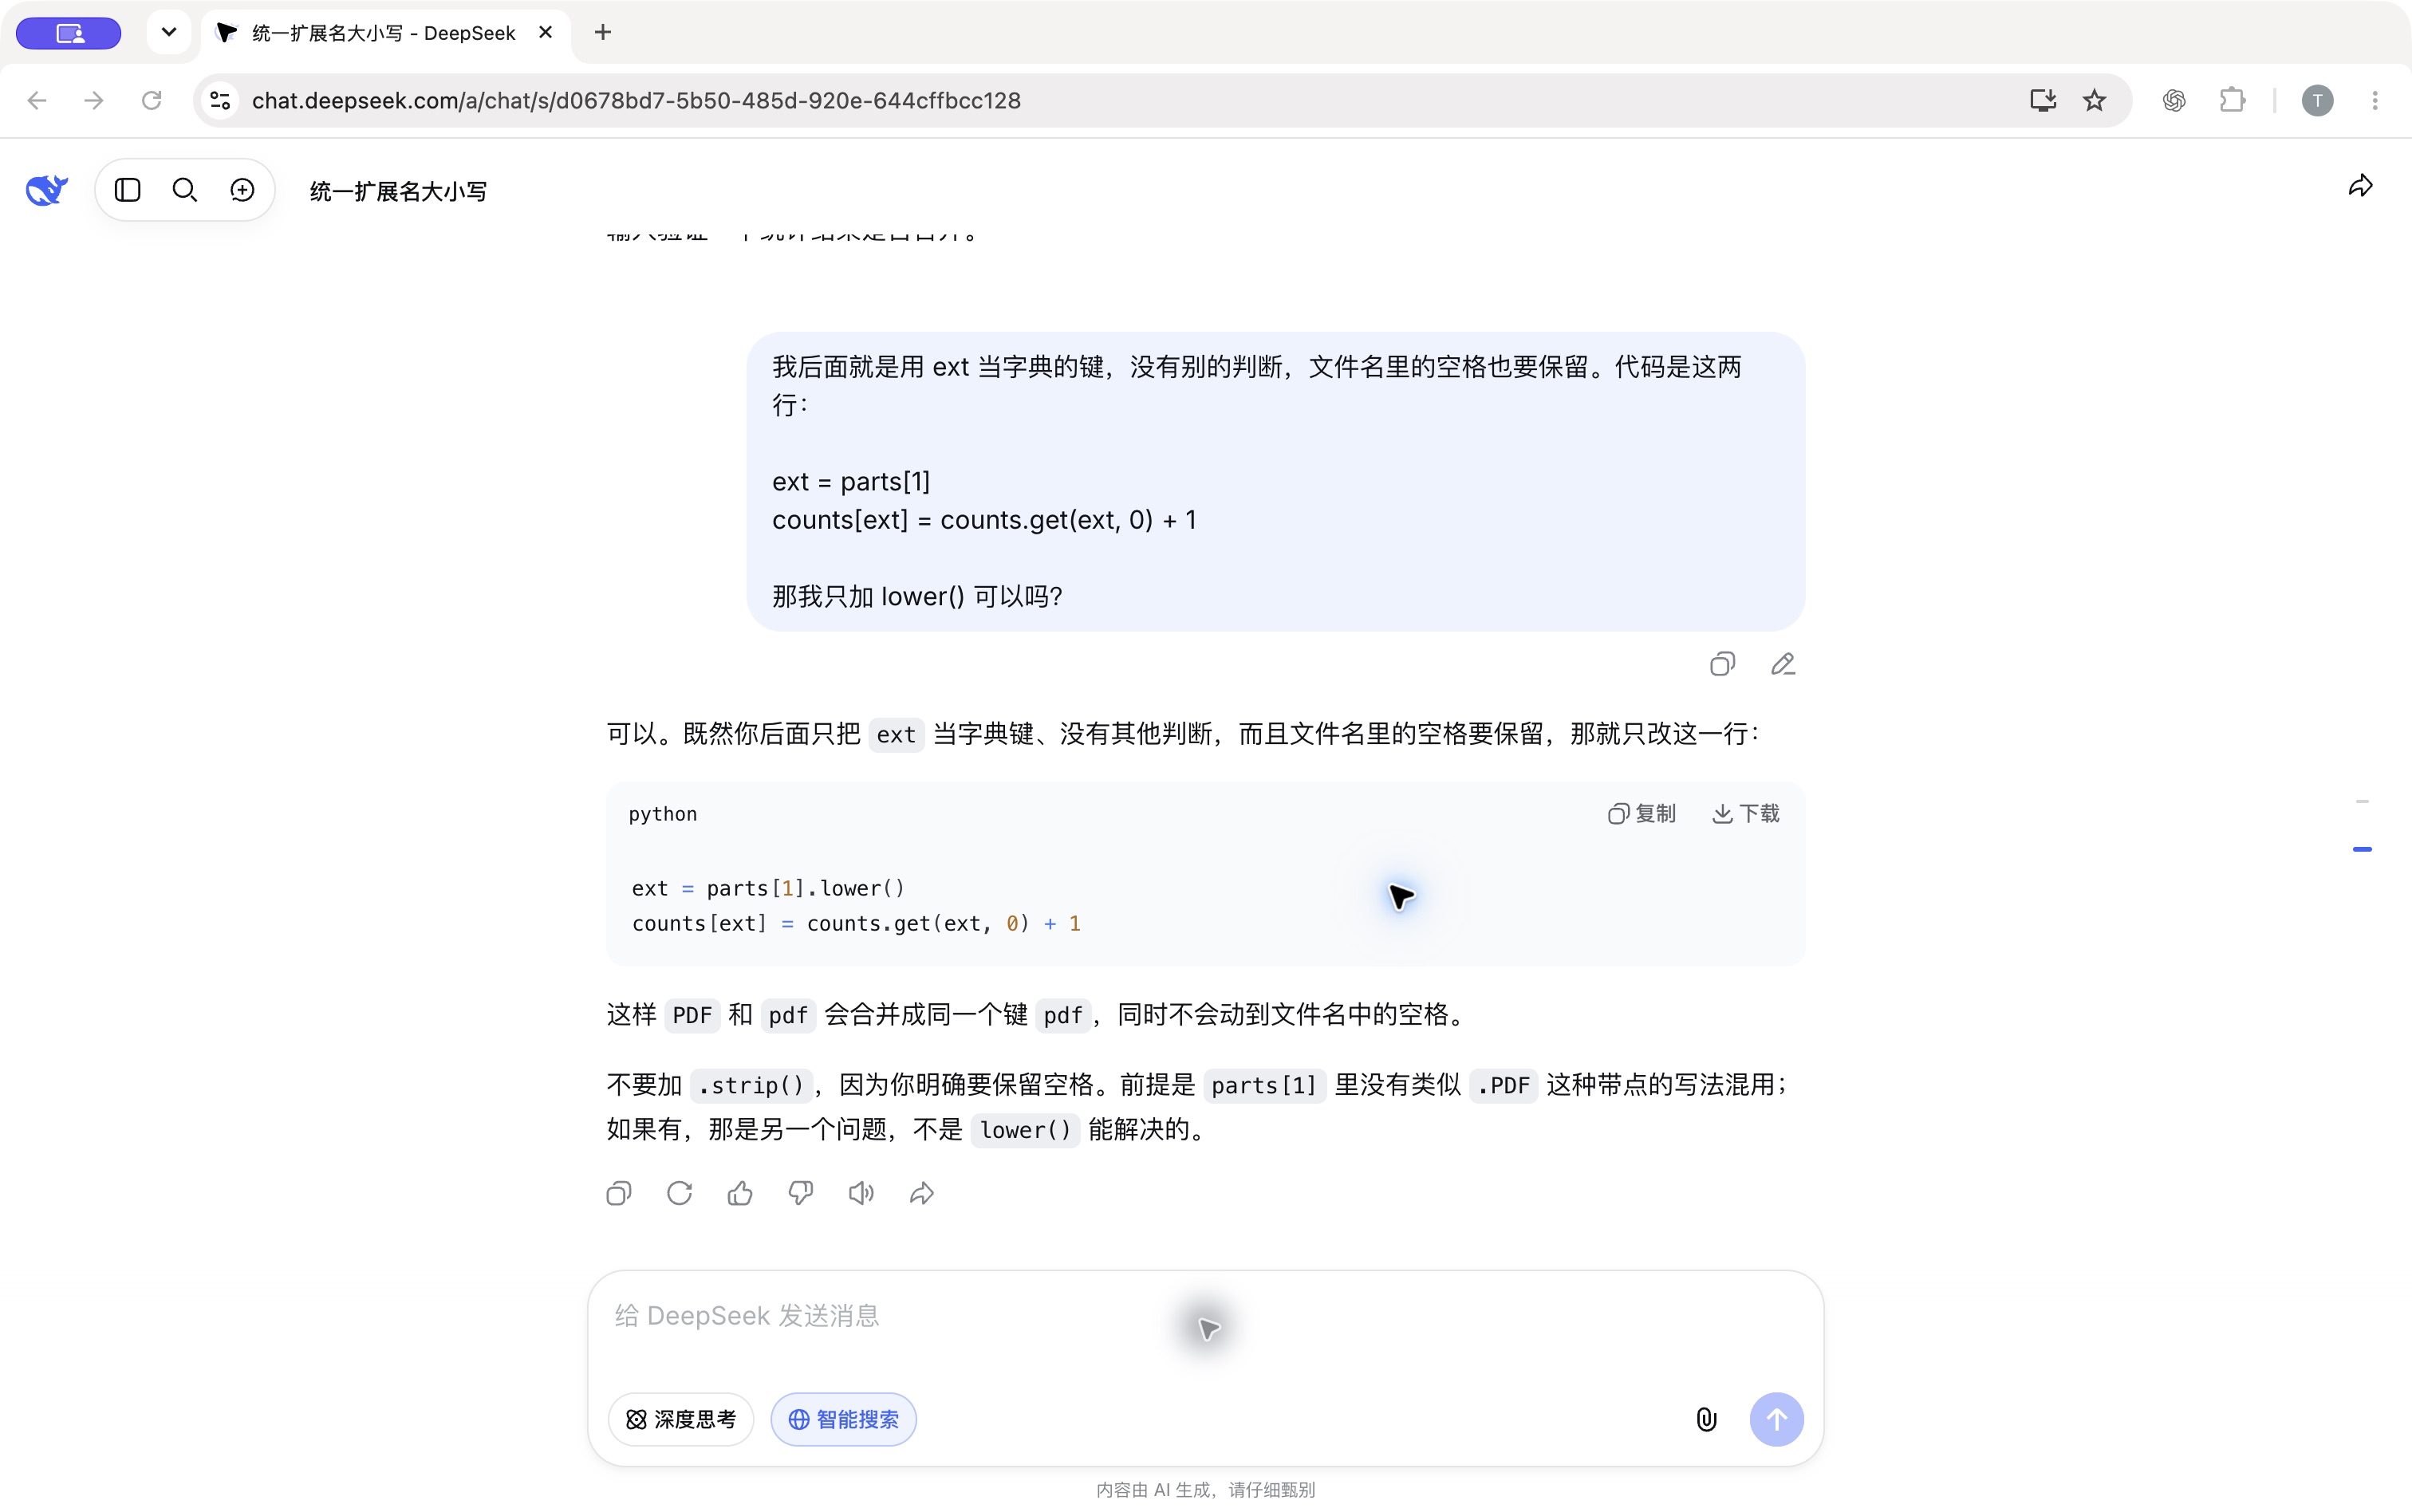
Sent to AI 发出的材料
前文要求:PDF / pdf 合并统计,其他部分先不动。
我后面就是用 ext 当字典的键,没有别的判断,文件名里的空格也要保留。代码是这两行:
ext = parts[1]
counts[ext] = counts.get(ext, 0) + 1
那我只加 lower() 可以吗?
AI reply 回答节选
这样 PDF 和 pdf 会合并成同一个键 pdf,同时不会动到文件名中的空格。
不要加 .strip(),因为你明确要保留空格。
ext = parts[1].lower()
DeepSeek Chat
点击放大完整对话
补充上下文,审查建议,只采纳符合任务的局部改动。
第一次只描述了 PDF/pdf 分开统计,DeepSeek 建议 lower,也额外提到了 strip。我们随后贴出相邻两行,说明 ext 直接作为字典键、文件名空格要保留,再问只加 lower 是否可以。实际回答确认只修改这一行,并明确不要加 strip。
这里采纳的是 ext = parts[1].lower()。lower 返回新的字符串;统计时使用新后缀键,原文件名列表保持。后面的实际运行对比继续检查 pdf 是否合并,也检查原来的无后缀类别是否保持。每一项额外修改都需要有任务依据。
Compare actual outputs before and after.
{'PDF': 1,
 'pdf': 1,
'(none)': 1}{'pdf': 2, '(none)': 1}相同输入对比结果,再确认其他约定没有改变。
两次实际运行使用相同输入 L01.PDF、L02.pdf、README。初版将 PDF 与 pdf 分开;加入局部 lower 后,pdf 为二,README 仍在无后缀类别。
这两版均为教师提供的材料,用于比较同一输入下的行为。学生保存文件、自己执行已有独立检查;还要检查空输入、输入不变等,不能只看当前例子。
result = names points to the same list.
1  def prepare(names):
2      result = names
3      result[0] = result[0].lower()
4      return result
5
6  files = ["L01.PDF", "L02.pdf"]
7  print(prepare(files))
8  print(files)
['l01.pdf', 'L02.pdf']
['l01.pdf', 'L02.pdf']
同一列表被改动,两个名字都能看见变化。
运行这个列表例子:两次打印都显示首个文件名整体变为小写。图中 files 和 result 指向同一列表,赋值不是复制。下方展示实际运行输出。
统计后缀只需规范化局部字符串,无须改写原列表。读 AI 建议时,既检查返回值,也检查输入和其他状态是否变化。
For README, splitting produces only one part.
return parts[1].lower()
Traceback (most recent call last):
  File "debug_suffix.py", line 5, in <module>
    print(suffix("README"))
          ~~~~~~^^^^^^^^^^
  File "debug_suffix.py", line 3, in suffix
    return parts[1].lower()
           ~~~~~^^^
IndexError: list index out of range
保留最小输入、相关代码和完整错误。
同一文件名任务的另一段教学局部实现先执行 parts = name.split("."),然后取 parts[1]。完整五行示例在下一页和配套文件 debug_suffix.py,调用 suffix("README")。
本页完整回溯由 Python 3.13 实际运行产生,调用位置是第五行,失败位置第三行。README 没有点,拆分只有一项,索引一越界。先让学生定位相关调用与失败表达式。
Send the code, input, expected result and traceback.
Sent to AI 发出的材料
这几行一运行就报错了,README 为什么不行呀?它没有后缀,我希望返回 "(none)"。帮我看看这几行怎么改就好。
def suffix(name):
    parts = name.split(".")
    return parts[1].lower()

print(suffix("README"))
另附上一页完整回溯:IndexError: list index out of range
AI reply 回答节选
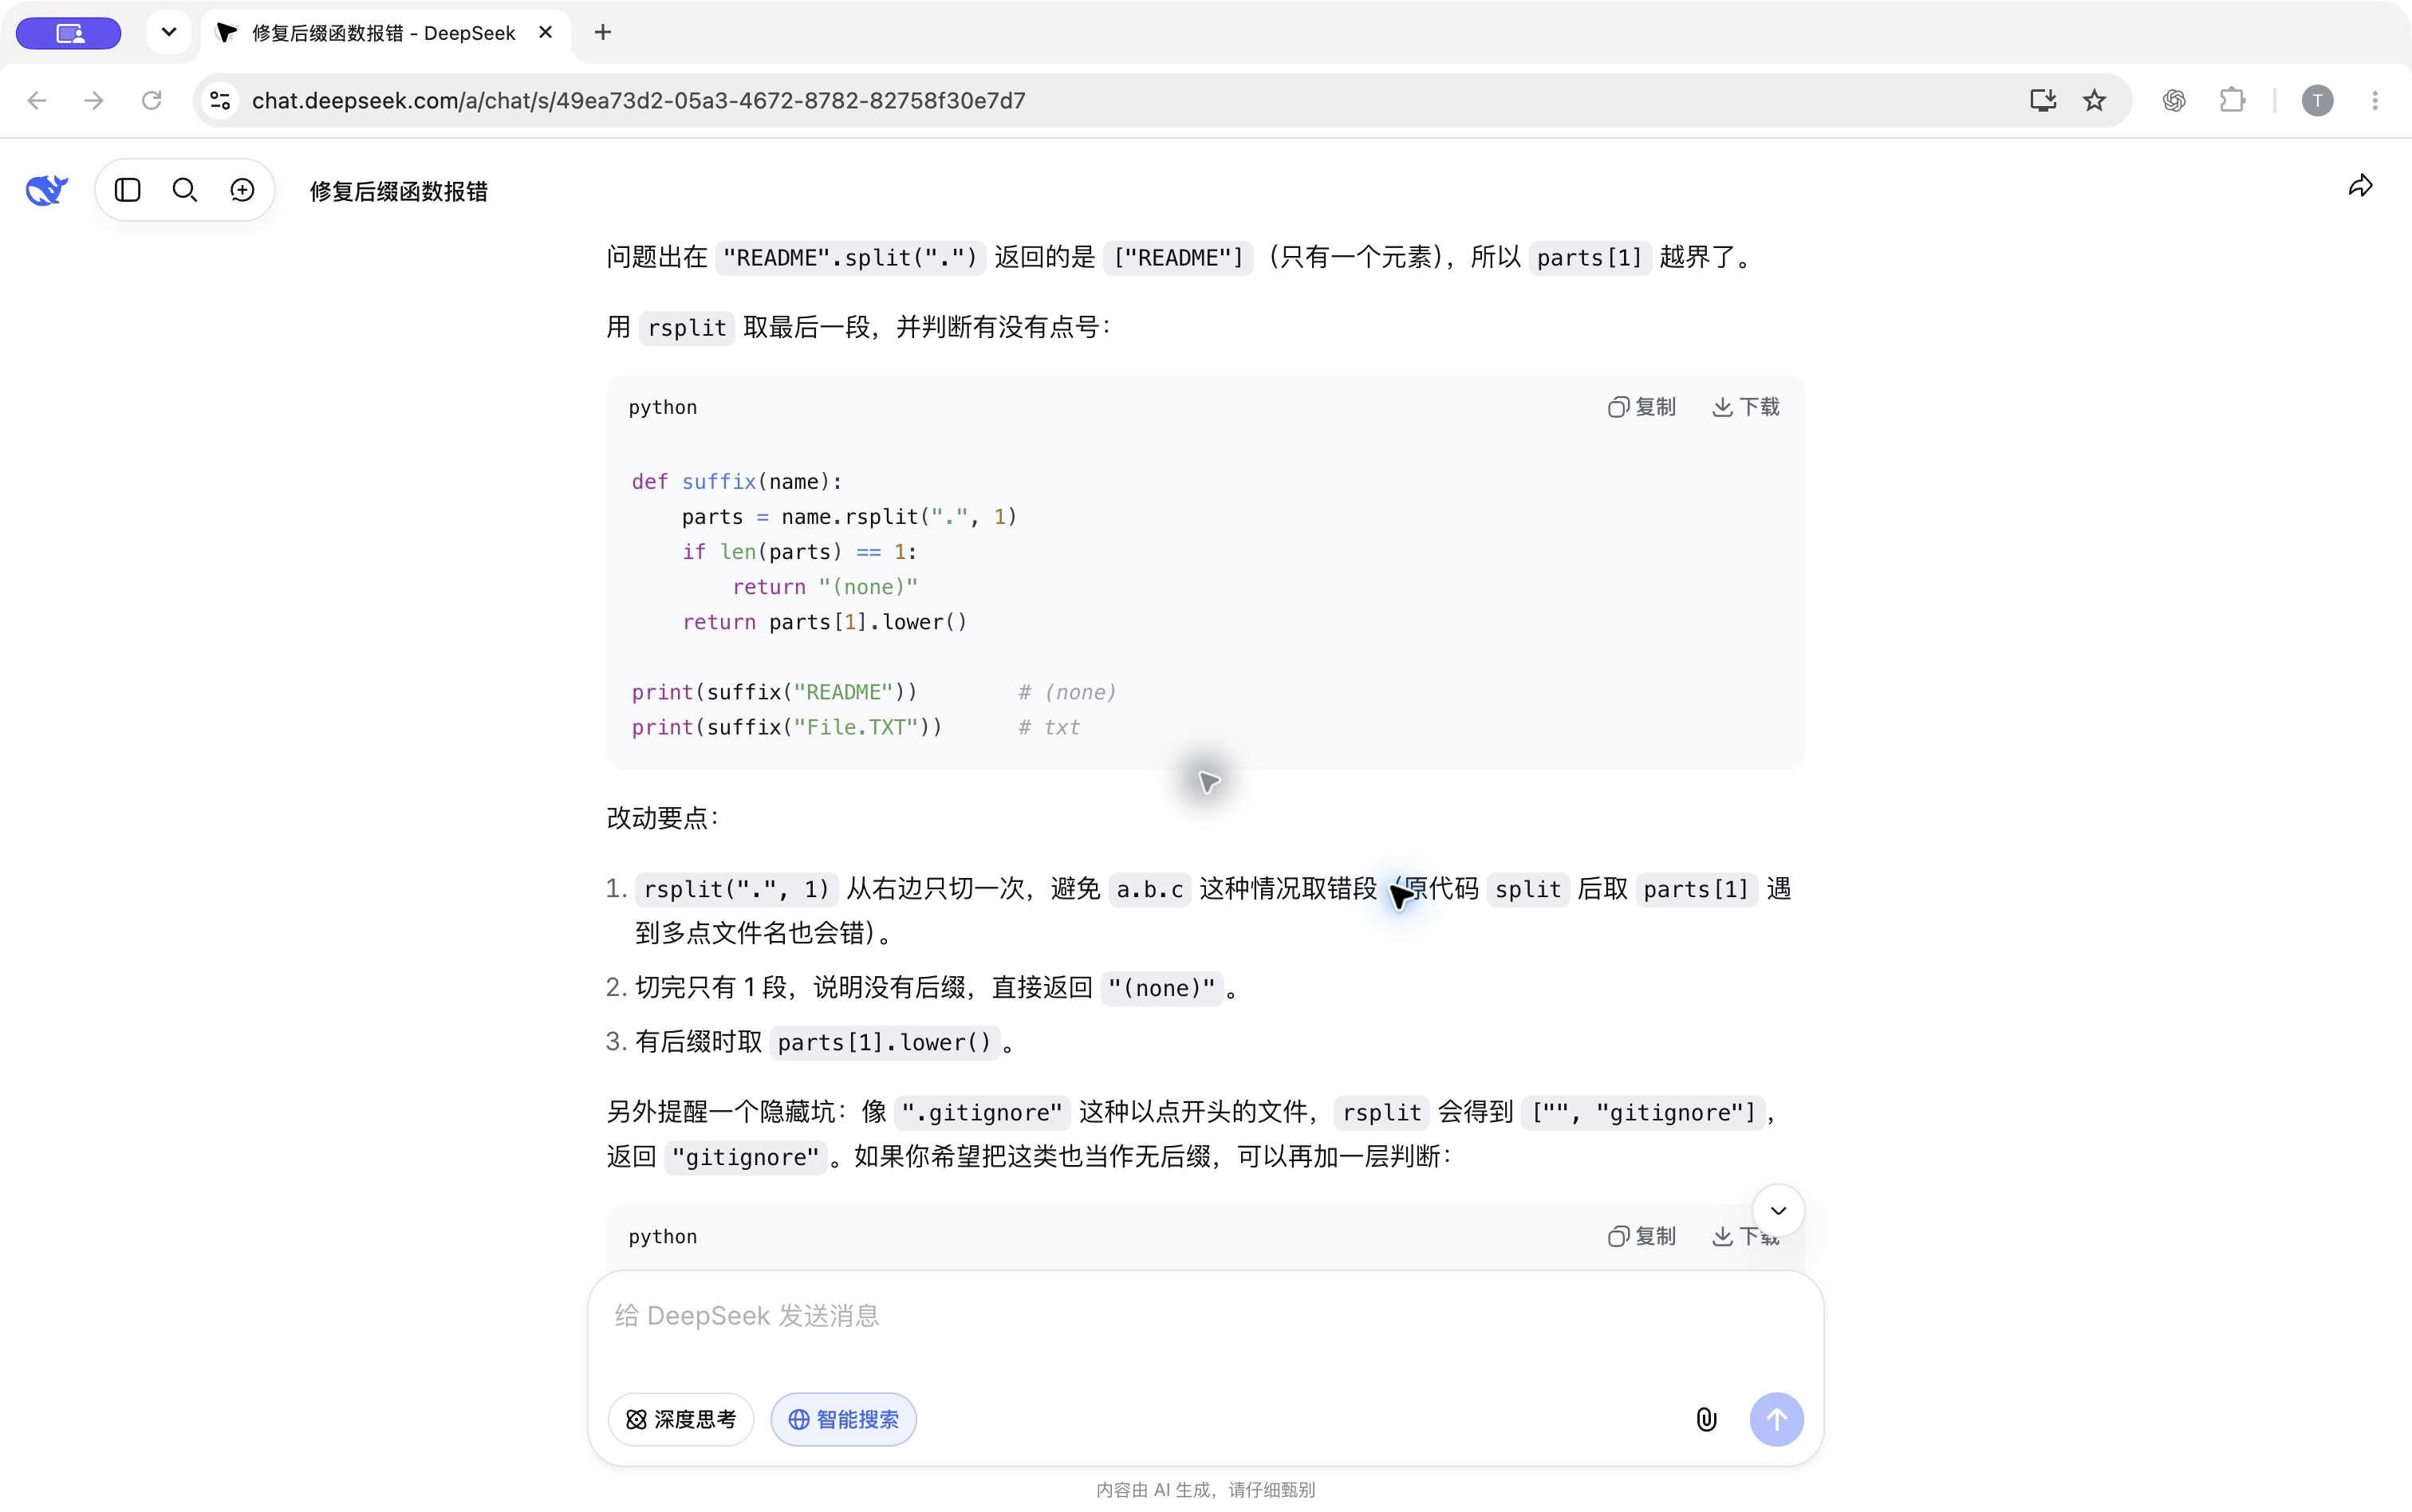
问题出在 "README".split(".") 返回的是 ["README"](只有一个元素),所以 parts[1] 越界了。
if len(parts) == 1:
    return "(none)"
DeepSeek Chat
点击放大完整对话
诊断能解释报错后,再检查修改是否符合全部约定。
我们把上一页的五行代码、README 输入、预期返回 (none) 和完整 traceback 发给 DeepSeek。实际回答指出:README.split(".") 只得到一项,所以 parts[1] 越界。它建议用 rsplit 从右侧切一次,并先判断是否只有一段。
右侧展示真实诊断节选和其中一处局部判断。本地运行第一版建议,README 已返回 (none),但还需要检查原有约定中的其他情况。下一页用末尾带点的 notes. 继续核对返回值,不能因为异常消失就认为全部正确。
No exception — does the return value meet the rule?
1  def suffix(name):
2      parts = name.rsplit(".", 1)
3      if len(parts) == 1:
4          return "(none)"
5      return parts[1].lower()
| Input | Actual | Expected |
|---|---|---|
| README | '(none)' | '(none)' |
| notes. | '' | '(none)' |
异常消失后,继续核对输入和真实返回值。
这是上一页 DeepSeek 实际给出的第一版局部改法。本地执行后,README 已返回 (none),File.TXT 返回 txt;但 notes. 返回空字符串,与末尾点号也归 (none) 的已有约定不符。
把真实返回值与独立预期对照,才能发现这个遗漏。DeepSeek 还另外提醒了隐藏文件的情况,但这个提醒没有覆盖末尾点号。因此仍要逐项检查原有任务,不把模型列出的情况当成完整清单。
Ask for test ideas using requirements and existing cases.
Sent to AI 发出的材料
我写了个统计文件后缀的小函数,PDF 和 pdf 要算一类,没有后缀的算 "(none)",也不能改原来的文件名。
我目前只试过 ["a.PDF", "b.pdf"],结果是 {"pdf": 2}。
这就算测全了吗?还应该先试哪两种情况呀?
本次未发送函数实现,只请 AI 补充测试思路。
AI reply 回答节选
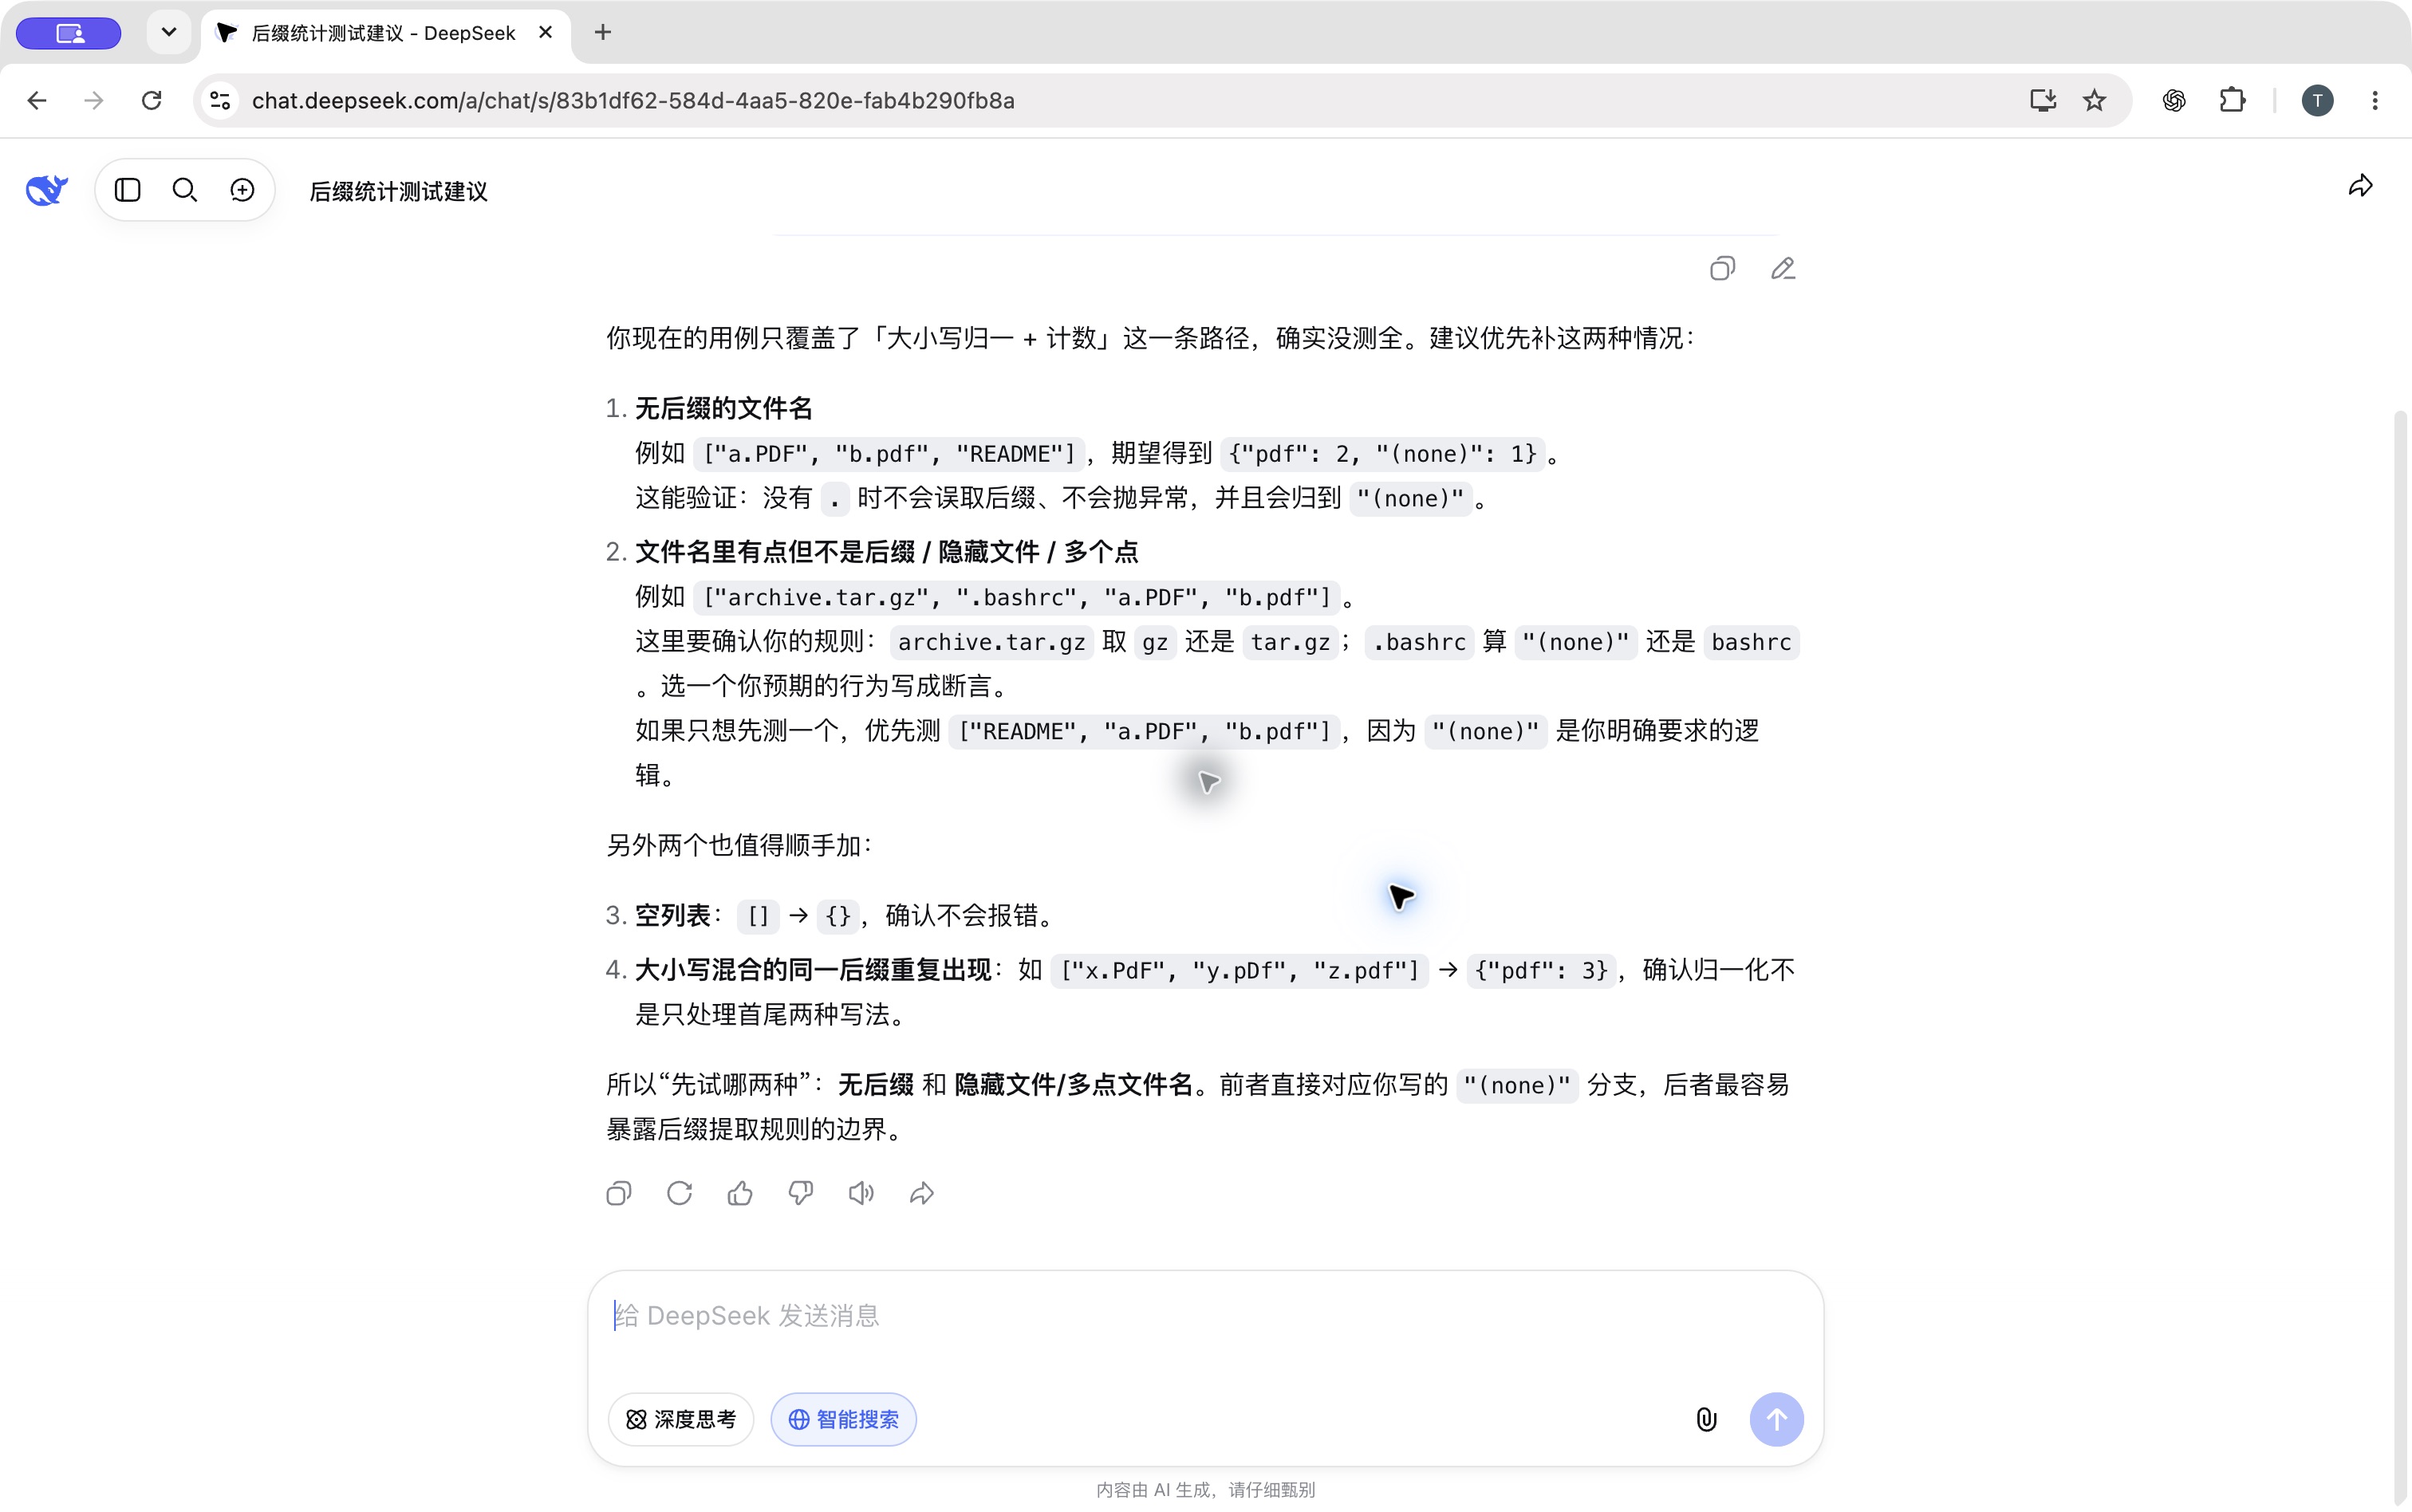
所以“先试哪两种”:无后缀 和 隐藏文件/多点文件名。
README → (none)
archive.tar.gz → gz
.bashrc → (none)
DeepSeek Chat
点击放大完整对话
测试思路可作补充;核验具体实现还需代码和运行证据。
这次实际请求只包含规格和已测输入、结果,没有发送函数实现。因此,我们只是请 DeepSeek 补充测试思路,不能据此声称它审查了代码或证明函数正确。它建议无后缀,以及隐藏文件或多点文件名,并提醒这些情况需要明确规则。
已有任务约定 README 与 .bashrc 归 (none),archive.tar.gz 的后缀为 gz。右侧结果是我们自己运行完整参考实现得到的,不是模型替我们执行的测试。检查具体函数时,还需要提供该函数代码,并由自己运行独立测试;继续保留空输入、输入不变和返回字典相互独立等检查。
Keep the local change and its evidence together.
- ext = parts[1]
+ ext = parts[1].lower()

git diff -- inventory.py
git status
看差异、跑检查、保存版本,并据实说明帮助范围。
左侧局部差异与实际材料一致,完整差异还含新增 docstring,记录保留。看完 diff 并重跑检查,再保存需要的文件与版本。
AI 声明写实际工具、局部生成或修改范围、本人完成的部分与真实验证。未知型号据实注明,未用 AI 也据实说明。Git 版本不证明代码正确。
Check an AI explanation against what your program actually does.
1  def factorial(n: int) -> int:
2      if n == 0:
3          return 1
4      return n * factorial(n - 1)
5
6
7  print(factorial(3))
Ask a concrete question
What is n in each recursive call?
Pause and inspect
Observe the line, variables and stack.
Follow up with evidence
Send the code + paused state to chat.
AI 帮你分析;调试器提供实际状态;自己核对后继续追问。
前面通过真实输入和输出检查 AI 的局部建议。若还想知道中间某一步的变量,单看最后结果就不够了。聊天助手可以解释代码,但我们没有把本机暂停状态发给它时,它并没有观察到那次运行。
为了把“解释”与“实际执行”接起来,复用 L7 的 factorial(3)。问题是:递归进入下一层时,之前的 n 在哪里,每次调用各自是多少?先自己设断点、查看变量和调用栈,再核对解释;若仍不理解,把这段代码、暂停在第几行、选中的调用及该调用的变量值一起发给聊天助手。这里是协作方法示意,没有冒充一段新的真实模型回复。
例如:在第 4 行暂停,最内层 n=1,另外两次调用等待,问为何选择外层帧后显示 n=3。代码与状态要一起提供。Level 1 中仍是学生自己启动和操作调试器,聊天 AI 只提供解释或局部建议。
Open factorial.py and pause before line 4 executes.
准备:安装 Microsoft Python 与 Python Debugger,打开解压后的项目文件夹。
Select Python 3.13
Python: Select Interpreter
Set a breakpoint
Click beside line 4 in factorial.py.
Start debugging · F5
Run → Start Debugging
Continue twice · F5
Observe n: 3 → 2 → 1.
先安装 Microsoft 的 Python 和 Python Debugger 扩展。解压课堂项目后,在 VS Code 用 File → Open Folder 打开 l08-classroom-demo 文件夹,不能只打开 ZIP。里面已附 factorial.py 和 .vscode/launch.json。
打开 factorial.py,通过 View → Command Palette 搜索 Python: Select Interpreter,选择课程 Python 3.13。在第 4 行行号左侧单击,出现红点就是断点。打开 Run and Debug 面板,选择随包配置 Classroom factorial(3),再用 Run → Start Debugging 或 F5 开始。若只打开一个自己的 Python 文件、没有配置,可在启动提示中选 Python Debugger → Python File。普通 Run Python File 只运行,不等于启动断点调试。
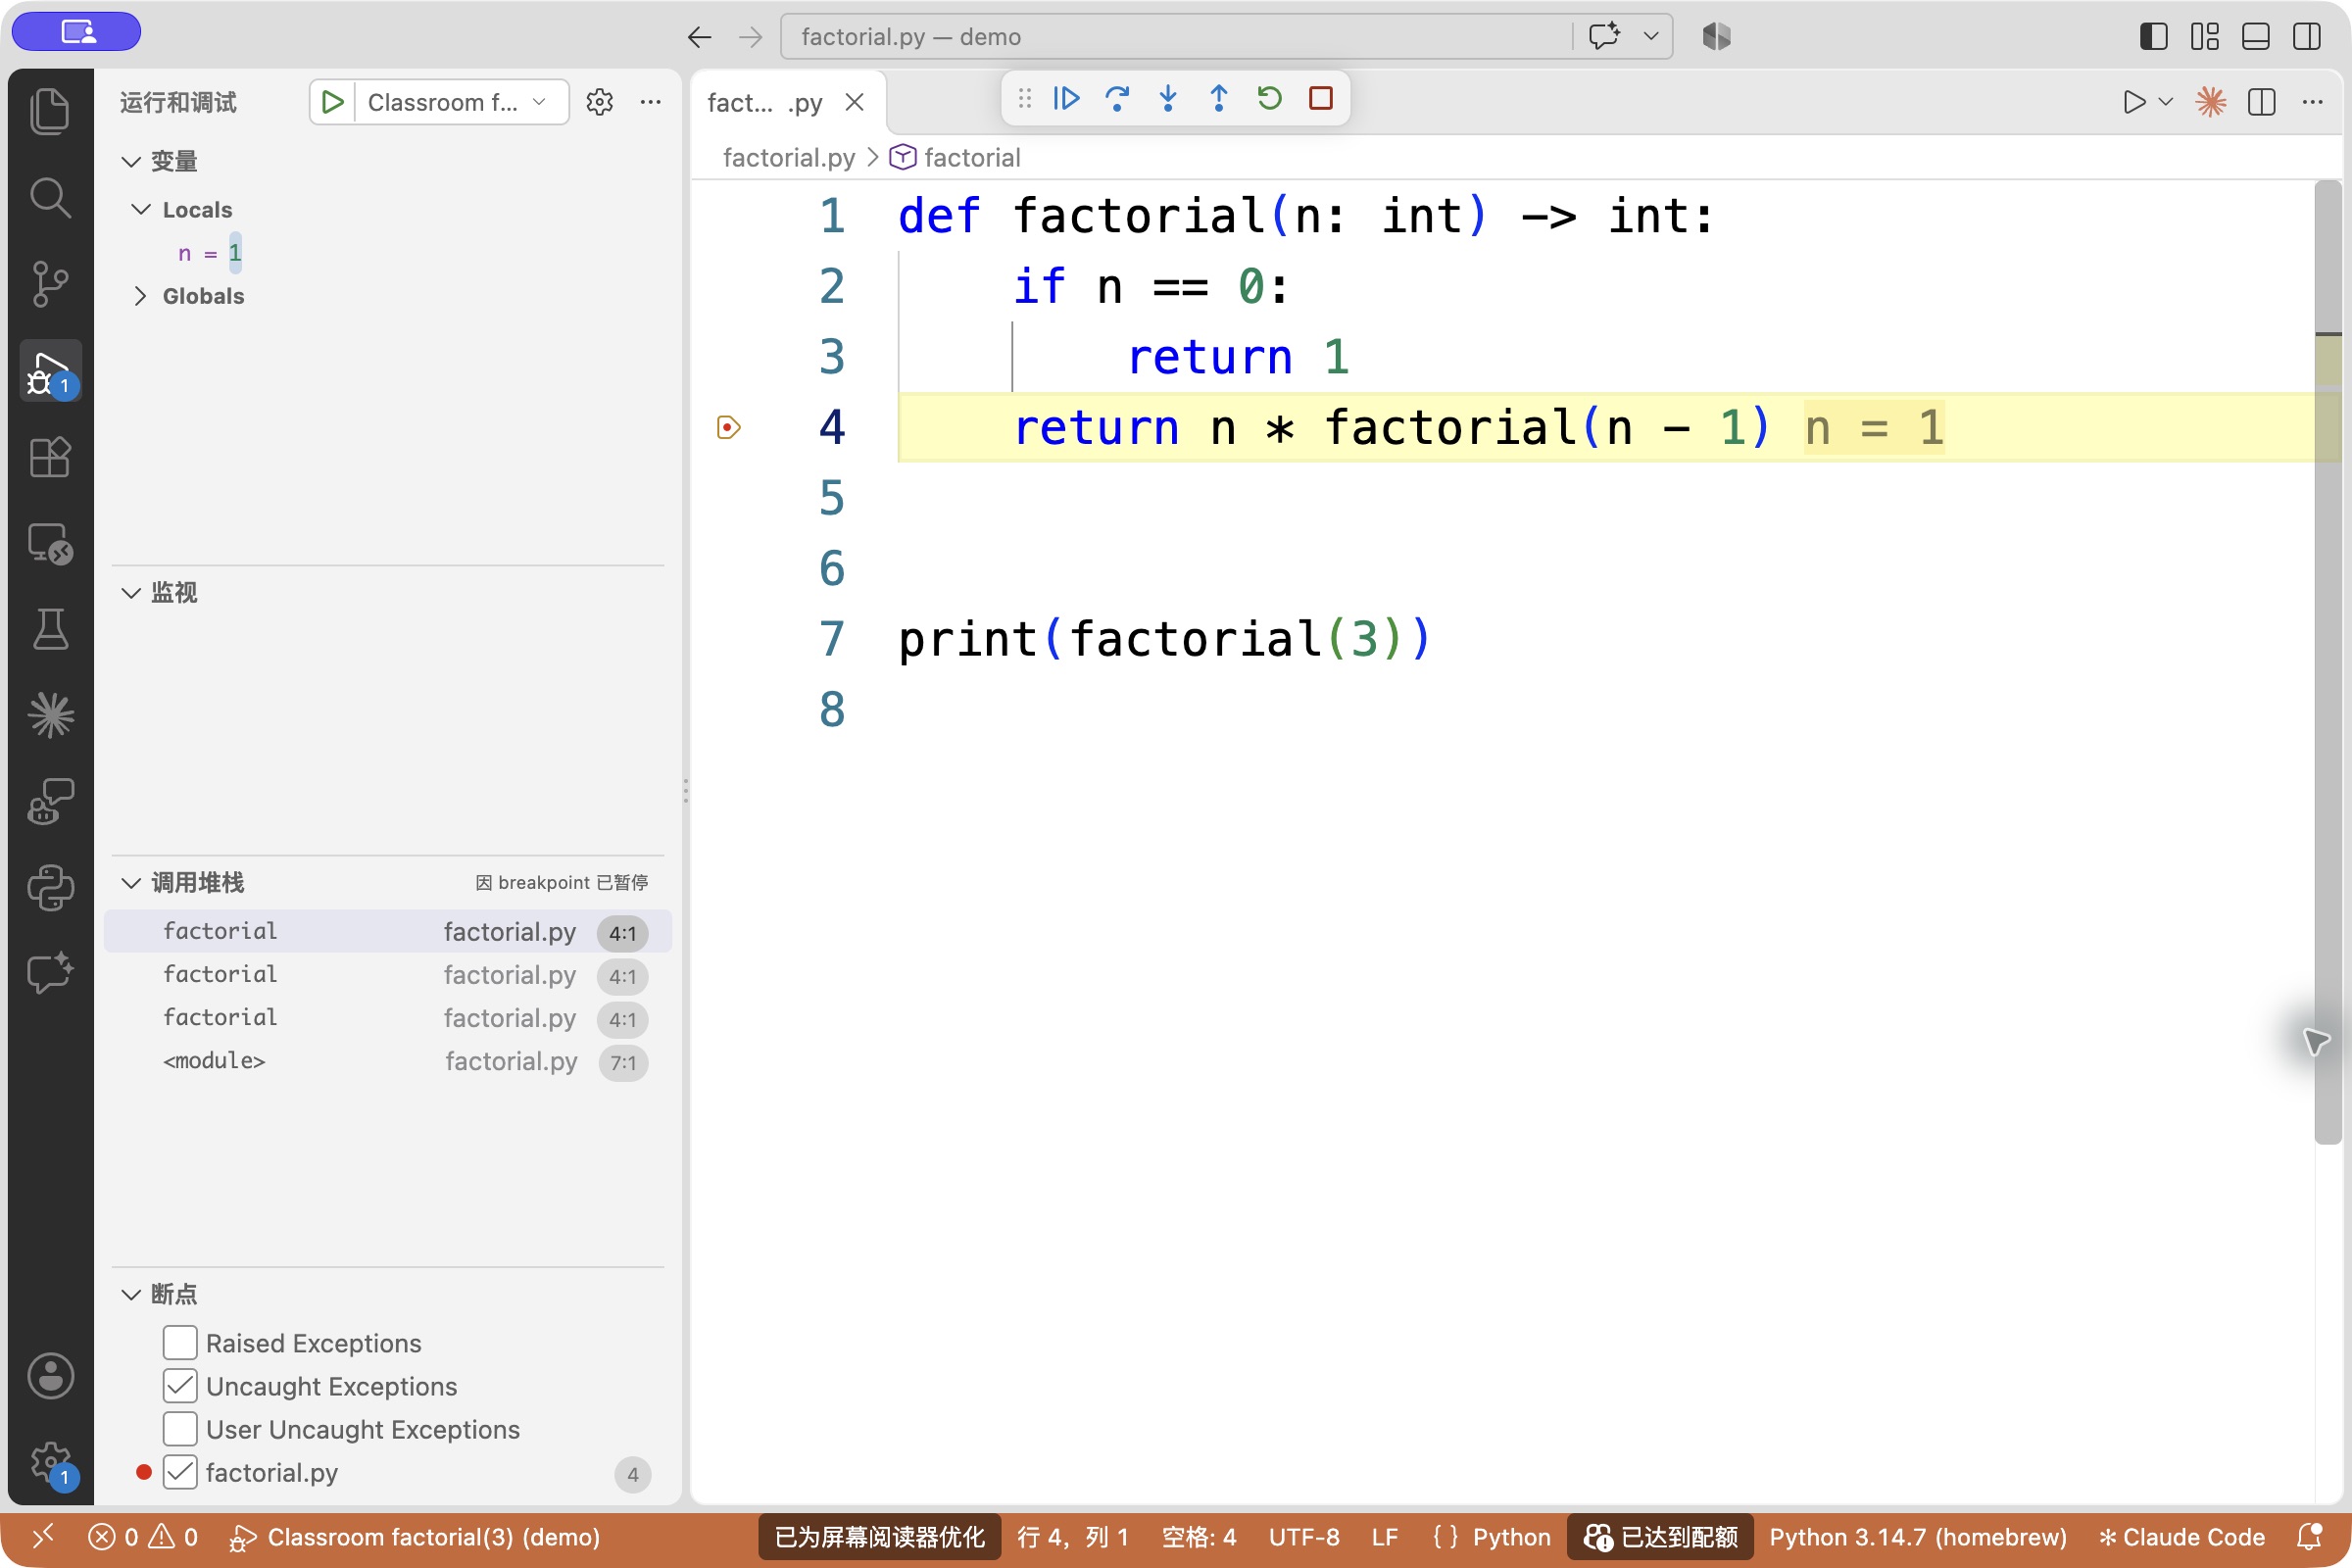
第一次到第 4 行时 n=3,再 Continue 两次会依次停在 n=2、n=1。断点所在的行此时尚未执行。下一页查看 Variables 和 Call Stack;选中不同调用帧是在查看它们各自的局部变量,不会让那次调用重新运行。截图来自真实 VS Code 调试会话,可点击右下角放大;截图解释器为本机 Python 3.14.7,相同代码和帧状态另用课程 Python 3.13 独立核对。
界面入口与解释器选择按 VS Code 官方 Python 调试文档核对:https://code.visualstudio.com/docs/python/debugging 。功能键被系统占用时可点击调试工具栏或用 Run 菜单。
Each frame keeps its own local n.
Into · F11
进入调用
Over · F10
单步,不进入调用
Out · Shift+F11
运行至当前调用返回
Continue · F5
继续至断点或结束
对应 C-2,保留真实 VS Code 调试界面:factorial(1) 在第四行暂停,另外两次 factorial 调用等待。选中外层调用后,它自己的局部 n=3,实际截图配套保留。
界面实际使用本机 Python 3.14.7,相同状态另由课程 Python 3.13 实际追踪核对。本人观察的暂停状态可以验证 AI 的解释。Into 进入调用,Over 单步执行当前行但不逐行进入调用,Out 运行到当前调用返回,Continue 到断点或结束。内部断点也可能让单步过程暂停;功能键不方便时点击工具栏。选中外层帧后看到的 n=3 不等于最内层暂停处的 n=1。
Choose evidence that matches the question you are checking.
import math

def f(l):
    unused = 1
    return missing_name + len(l)
| Rule | Actual finding |
|---|---|
| F401 | math imported but unused |
| E741 | Ambiguous variable name: l |
| F841 | Local variable unused is assigned to but never used |
| F821 | Undefined name missing_name |
用实际工具结果检查建议,不只看 AI 的解释。
保留既有 C-1 练习四条显式规则的真实 Ruff 诊断:未使用导入、易混淆名字、未使用局部变量和未定义名称。版本与原始记录保持。
格式检查观察排版,lint 检查所启用规则,运行测试观察选定输入的行为,调试器观察暂停状态。不同工具互补,无警告不能证明符合全部任务。
Use context, local help and your own checks.
前半我们关心代码在做什么:给 AI 相关代码和事实,获得局部建议,再用运行、调试和检查核对行为。图中的循环回顾这一工作方式。
现在把问题往下问一层:调试器里的程序正在运行,它的 CPU 时间由谁安排?变量放在哪里?读文件和向终端输出又由谁支持?代码描述计算逻辑,Python 解释器执行这些逻辑,但程序也依赖操作系统管理资源和提供服务。
下一页的视频从一行 Python 出发,解释幕后发生的事情。我们由此进入第二部分,以 Linux 为例认识操作系统,再练习终端使用;不增加项目整合任务。
An operating system provides the services a program needs.

Tux
图:Larry Ewing
从一行 Python,看看操作系统在幕后做什么。
上一页问:谁给程序安排 CPU 时间、管理内存并提供文件访问?这就是接下来要认识的操作系统。Python 解释器执行代码,操作系统管理运行所需的资源并提供服务。Linux 内核是这类系统的核心组件之一。
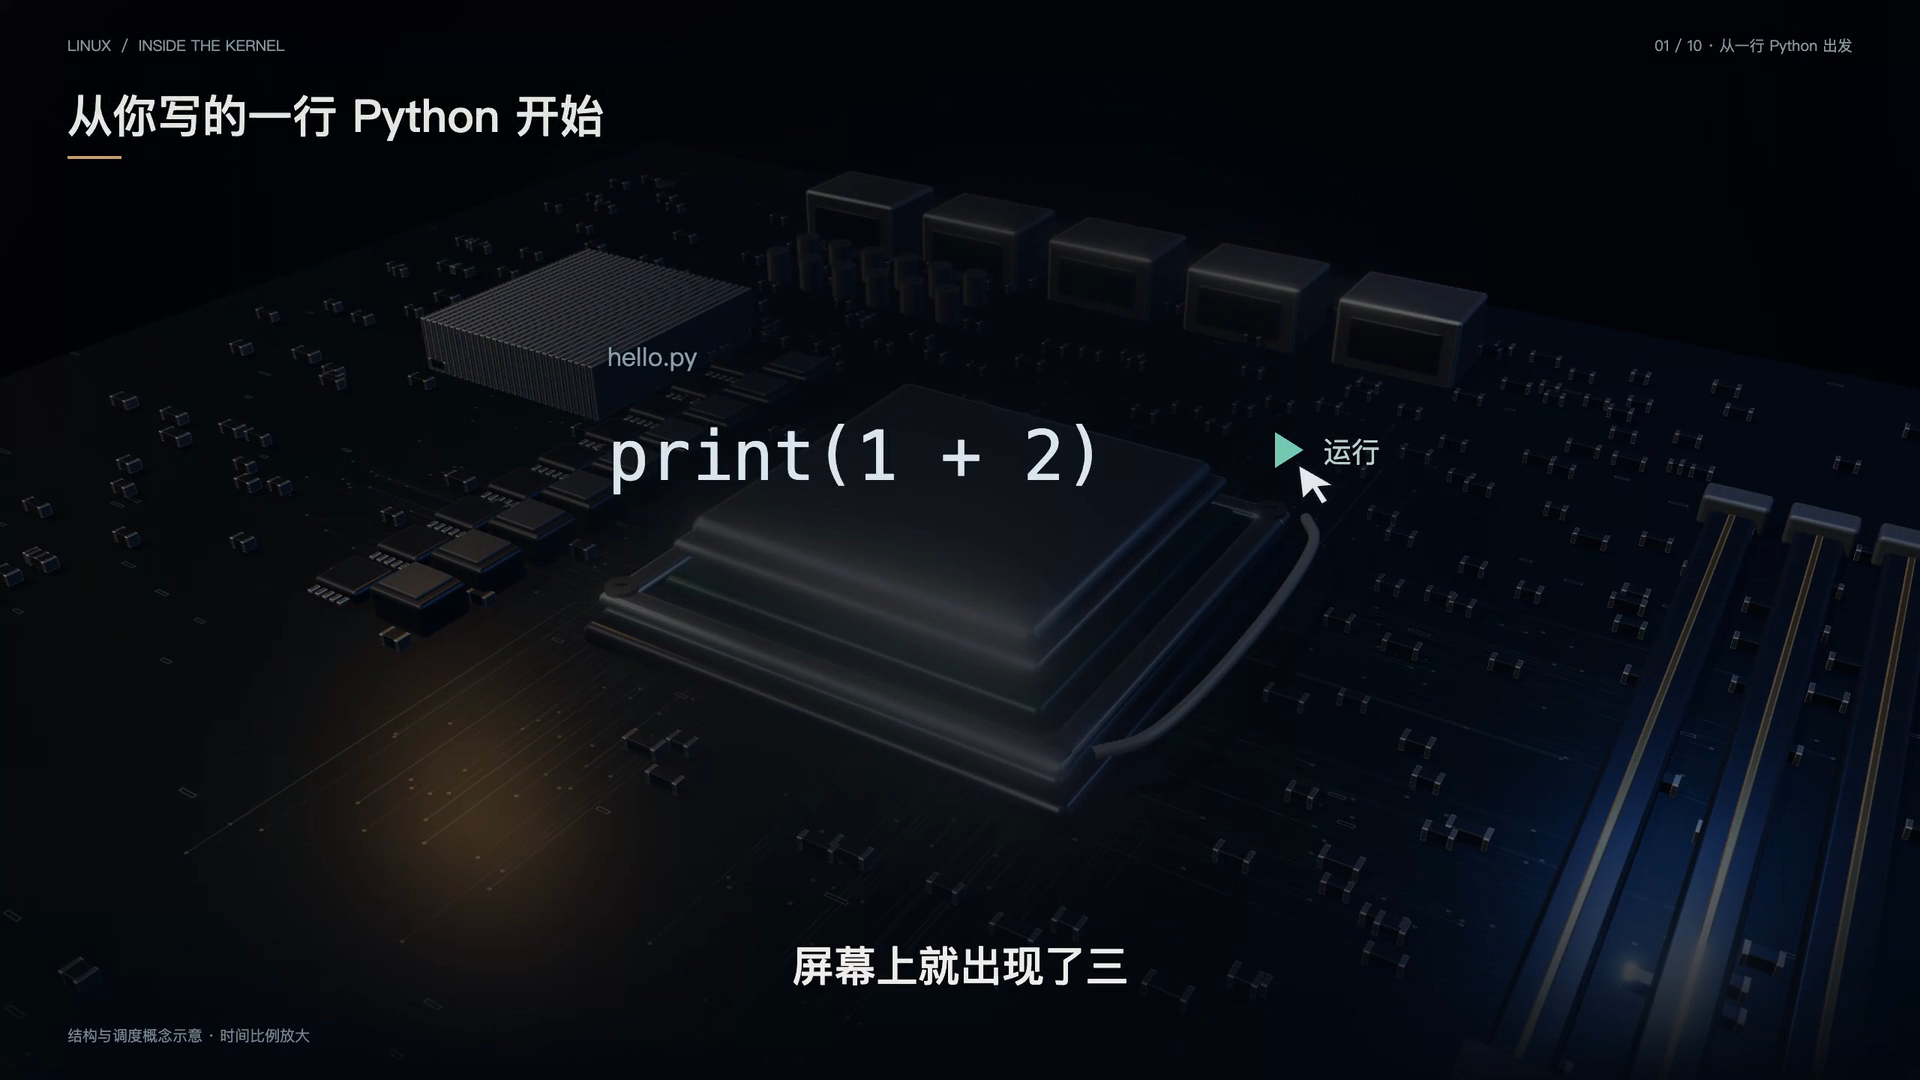
视频从一行 print(1 + 2) 出发,让我们看到屏幕出现结果之前,幕后有哪些组件在工作。
观看视频时,带着三个问题:为什么多个程序可以同时运行?Linux 内核负责哪些工作?我们使用的终端、shell 和应用程序,与内核是什么关系?
看完后进入 Linux 部分,继续认识内核、发行版、shell,再用几个小例子练习终端操作。
A useful tool needs services beyond its own code.
一个简单的 hello.py 也需要系统支持:从磁盘读取程序,在内存中保存运行状态,获得 CPU 时间,并把 hello 写到终端。
Python 解释器负责执行 Python 代码;操作系统负责管理程序使用的资源,并提供文件访问等服务。理解这两层的分工,才能解释同一段代码为什么还会受到运行目录、权限和环境的影响。
Useful tools grew around a shared computer.
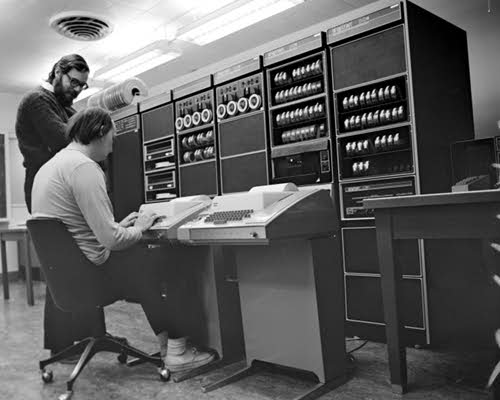
Bell Labs archive · early 1970s
从真实的使用需要出发,系统与工具逐步发展。
Unix 于 1969 年在贝尔实验室起步。照片拍摄于二十世纪七十年代早期,展示 Thompson(坐着)和 Ritchie(站立)使用 PDP-11 的场景。
当时,一台计算机往往需要供多人通过终端使用。怎样让不同任务共享机器、怎样方便地处理文件和文字,都是实际需求。Unix 后来也用于专利部门的文字处理;系统与工具的发展,与这些具体任务紧密相连。
A working system needs more than a kernel.
这条时间线连接三个重要节点:1969 年 Unix 起步,1983 年 GNU 项目宣布,1991 年 Linux 内核出现。Linux 借鉴 Unix 的设计思想,内核代码独立编写。
一个可用的系统还需要 shell、编译器、库和其他工具。GNU 工具与 Linux 内核结合,成为许多 Linux 发行版的重要组成部分。Linux 0.01 的原始说明也提到了对这些外部工具的需要。我们日常使用的发行版,是许多人和项目共同完成的成果。
In 1991, a student invited others to help.

kuvaaja / Linuxmag.com · CC BY-SA 3.0
照片摄于 2004 年;项目起点是 1991 年。
Linus Torvalds 在赫尔辛基大学读书时开始编写 Linux,并于 1991 年八月公开介绍这个项目,邀请其他人参与。页面上的照片拍于 2004 年。
早期 Linux 的目标和能力都很有限。0.01 版本的原始说明介绍了当时支持的硬件,也说明了运行系统还需要 shell、编译器和库。从一个学生的兴趣项目,到不断扩展的协作项目,公开代码和共同改进发挥了重要作用。
One kernel family supports many kinds of devices.
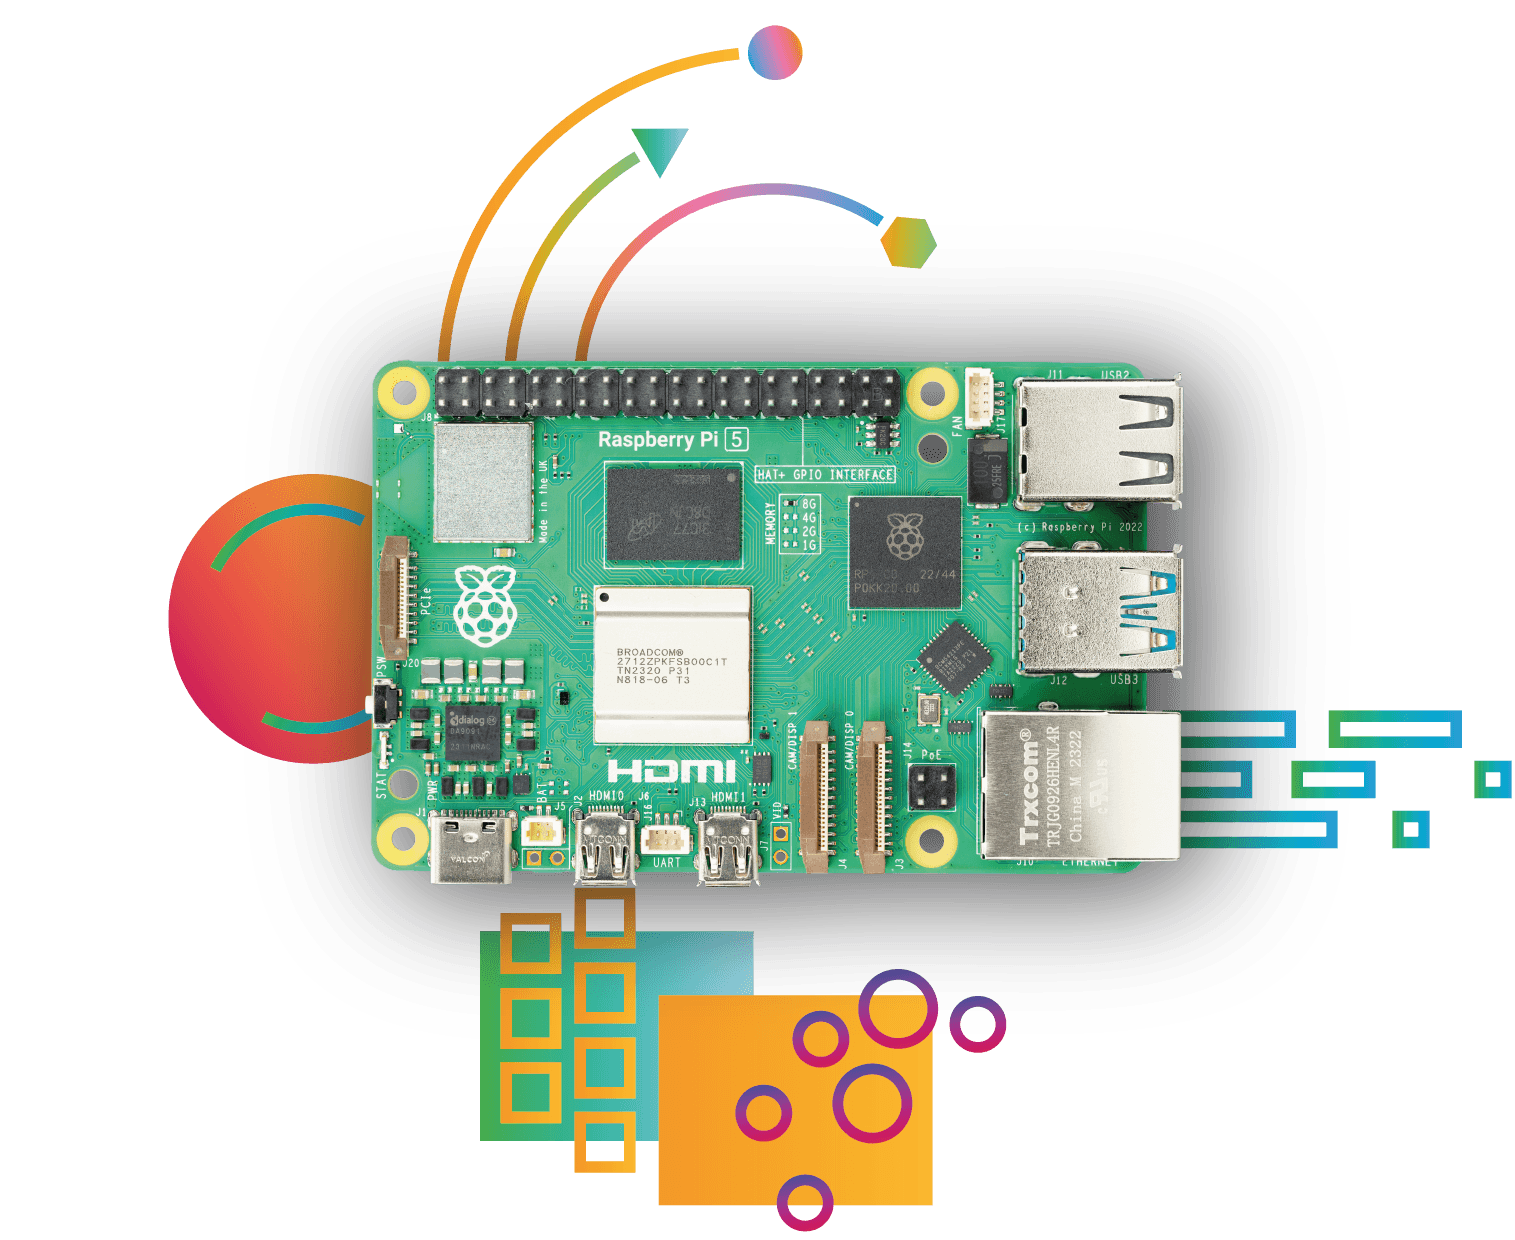
Raspberry Pi · official image
界面不同,程序仍需要系统管理资源。
图中的 Raspberry Pi 5 是一台小型单板计算机,可以运行基于 Linux 的 Raspberry Pi OS。服务器和许多开发设备也使用基于 Linux 的系统。
这些设备的界面、应用和工具可能很不一样,但都需要内核管理资源。Linux 内核与桌面界面属于不同层次:服务器可以没有桌面,使用 Linux 也不意味着只能输入命令。
Applications share hardware through managed services.
从浏览器、音乐和 Python 同时运行引出作用:调度进程、管理内存和地址空间,通过文件系统与驱动等组件管理文件设备访问。
多核可以并行,单核也会调度多个任务。不能说每个程序永久占一个核心。这里建立边界,不提前展开操作系统课程全部细节。
Bash starts Python; Python requests system services.
沿本次启动走一遍:终端承载 Bash,Bash 根据路径启动解释器,Python 运行脚本,读文件与写输出需要系统服务。
让学生指出哪一层解释 shell,哪一层解释 Python。用 python3 hello.py 启动一个简单程序,区分 shell 解释命令与 Python 执行代码;应用不能任意直接操纵硬件。
A usable system needs more than the kernel.
Linux kernel 内核
CPU · memory · devices
Ubuntu
A Linux distribution 发行版
Other Linux distributions: Debian GNU/Linux · Fedora Linux
Ubuntu 是一种 Linux 发行版,Linux 内核是它的组成部分。
Linux 严格说是内核,负责 CPU、内存和设备等底层资源管理。要让用户方便地安装和使用系统,还需要工具、库、软件安装和更新机制以及应用。发行版就是把这些组件组合、配置并维护为一个可使用的软件系统。
右边用 Ubuntu 举例:它包含 Linux 内核,也组合 Bash 等工具、库、apt 包管理和应用。图是组件关系示意,不表示每一种安装方式都默认带上图中的应用。Ubuntu Desktop 可以配桌面,Ubuntu Server 可以不装图形桌面。硬件在这些软件之外,不是发行版中的一个软件包。
所以,Ubuntu 是一种 Linux 发行版,Linux 内核是它的组成部分。日常说“用 Linux”,常常是在泛指使用 Ubuntu、Debian GNU/Linux 或 Fedora Linux 这类基于 Linux 内核的系统;发行版之间还会有工具选择、包管理、默认配置和更新维护方式的差异。这里先掌握范围关系,不展开选型比较。
说明依据:Ubuntu 项目 https://ubuntu.com/about 、Debian https://www.debian.org/intro/about 、Fedora https://fedoraproject.org/ 。Tux 原作者 Larry Ewing,使用 The GIMP 创作;图像许可与出处见维护记录。
Use the environment you have actually started.
命令相似,不代表内核相同。
先确认自己当前运行的是哪个系统环境,再判断命令与路径的含义。
WSL 2 在轻量虚拟机中运行真实 Linux 内核,不是给 PowerShell 换外观。macOS 使用 XNU,命令相似不等于内核相同。本课沿用已准备环境,不重装系统。
Commands depend on a shell and filesystem context.
对照的是常见默认,Windows 可配置大小写敏感,Linux 也可挂载其他文件系统。先看终端标签和提示符,分清 PowerShell、cmd、WSL Bash。
运行目录、路径与解释器都属于有效上下文。遇到问题时,先确认当前目录、shell 和解释器。
Start with one small program.
mkdir -p terminal-demo
cd terminal-demo
touch notes.txt
# Save print("hello") in hello.py
python3 hello.py
hello
先保存 hello.py,再在它所在的目录运行。
在自己的练习位置创建 terminal-demo,进入该目录,再用 touch 创建空的 notes.txt。随后用编辑器新建 hello.py,写入 print("hello") 并保存,再执行 python3 hello.py。右侧是这一步实际输出的 hello;前面几条创建与切换命令正常时没有输出。
touch 不会替我们写程序,也不会清空已有文件。这里是一个独立终端小例子,无须下载前半讲的统计项目,也不涉及实验目录。这些操作只涉及自己创建的练习文件。
Know where you are and which Python runs.
pwd
cd "course files"
python3 --version
python3 -m pip --version
先确认当前位置和解释器,再判断命令为什么出错。
pwd 查看当前位置;带空格的路径用引号括起来,course files 是已存在目录的写法示例,不要求此刻创建它。Tab 用于补全已存在的名字。
python3 --version 确认解释器,python3 -m pip 对应这个解释器的包工具。Ubuntu apt 管系统软件,pip 管对应 Python 环境的包。环境准备按课程已有说明,不在这里展开安装流程。
find selects paths; wc -l counts their lines.
在一个简单目录中,hello.py 和 helper.py 是 Python 文件,notes.txt 不是。find 从当前目录点号开始递归,-type f 限定普通文件,-name 后的模式只选择 .py 名字。星号用单引号保护,避免 shell 先展开。
find 输出两行路径,管道把这些文本交给 wc -l,实际得到二。这里的文件名没有换行,所以一条路径正好一行。ls -l 的排版行不能直接当作文件数。
> sends standard output to a file.
python3 hello.py > output.txt
cat output.txt
hello
> 覆盖;>> 追加;cat 查看保存的内容。
把 hello.py 的标准输出重定向到 output.txt,再用 cat 读取它。实际终端输出 hello。重定向由 shell 处理,不需要修改 Python 程序。
output.txt 已存在时,> 会覆盖它;>> 会追加。普通 > 不会自动保存标准错误。只在自己的练习目录演示。
Use grep to locate a line in your source.
grep -n -F 'print(' hello.py
1:print("hello")先找一个文件中的一行,再扩展到目录搜索。
在刚才的 hello.py 中查找字面文本 print(。-n 显示行号,-F 表示按普通文字匹配,所以左括号不当作正则表达式。实际输出 1:print("hello"),前面的 1 是行号。
先掌握在一个文件中查找;需要查整个目录时,再查看 grep 的递归选项。这里不引入额外的文件树或作业背景。
Use a few shortcuts to keep working.
会找帮助,比背完整命令表更实用。
Ctrl+C 中断前台命令,不等于删除文件或关掉终端。历史命令可以复用,但仍要确认当前位置。
man 分页器常用 q 退出,--help 是否支持取决于具体命令,shell 内建命令也可用 help。macOS BSD 与 Linux GNU 工具的部分选项不同,查当前环境的帮助。

题目给出一个简单目录,只有 hello.py、helper.py、notes.txt、output.txt。find 从当前目录选择 .py 普通文件,输出两行路径,wc -l 得二。
不带实验目录或前几周背景。下一页先回顾答案,再总结 Linux 的三层概念,结束主线。
Quiz 1: 2 Python files — find selects, wc counts.
能解释系统各层,也能在终端完成几件小事。
回顾这道小测:只有 hello.py 和 helper.py 匹配 .py,所以答案为二。find 输出路径文本,wc -l 统计换行;本例文件名无换行。
用三个概念收束 Linux 部分:内核管理 CPU、内存与设备等共享资源;发行版组合内核、工具、库和应用;shell 解释命令并启动程序。我们已经练习定位目录、运行 Python、查找文件和文字、保存输出及查帮助。
本讲到这里结束。前半学习 AI 局部辅助与本人调试验证,后半认识 Linux 并动手使用终端。后续参考页用于课后查阅,不再引入项目整合或实验说明。
Use facts that another person can reproduce.
例如:解释 PDF/pdf 的差异,只建议 ext 的修改。
课后按四项组织材料,不要求逐字复制模板。异常提供完整错误,逻辑失败提供输入返回值。
解释和实际执行分别记录,没运行过就据实说明。
Preserve a known version before a small revision.
git status
git diff
git diff -- inventory.py
git restore -- inventory.py
恢复之前,先确认要丢弃哪些改动。
先看差异,确认具体路径。restore 会丢弃指定文件未提交的修改,必要时另存,不对整个项目随意运行。
这是查阅说明,不要求现在执行。保存历史不能替代验证,声明写真实范围即可。
Connect each command to one observable action.
| Action | Command |
|---|---|
| Locate | pwd / ls / cd |
| Create | mkdir -p / touch |
| Read | cat / head / less |
| Search | grep -rn -F |
| Action | Command |
|---|---|
| Count | find ... | wc -l |
| Save | command > report.out |
| Interrupt | Ctrl+C |
| Help | man / --help |
从当前目录查找,先看清命令选择的文件类型。
touch 不写代码,> 可能覆盖,管道只传标准输出,wc -l 数换行。统计沿用无换行文件名的约定。
在自己的练习目录操作;q 通常退出分页器,具体选项查当前环境帮助。
Match paths to the actual environment.
| Environment | Distinction |
|---|---|
| Windows | PowerShell / cmd; drive paths |
| WSL 2 | Linux kernel in a lightweight VM |
| macOS | XNU; Unix-style tools |
相似命令不等于相同内核与文件系统。
Windows C 路径与 WSL 挂载写法不同。按实际环境确认位置;macOS BSD 工具与 Linux GNU 工具有参数差异。
课前准备环境,这里不要求双启动、重装或修改系统配置。
Combine the traceback with paused state.
| Action | Meaning |
|---|---|
| Into | enter called function |
| Over | execute current line |
| Out | run until this call returns |
| Continue | run to breakpoint/end |
暂停位置与选中的调用帧要分别看。
不机械背“倒数第二行就是错误行”,结合多行回溯找调用和失败位置。print 与调试器用途互补。
选中帧是查看该次调用,不会让它重新运行;n=1 暂停时外层 n 仍为三。按需要保存暂停位置、所选调用帧和变量值,便于复查。
Check the environment before changing system software.
python3 --version
python3 -m pip --version
ruff --version
ruff check practice.py
ruff format --check practice.py
没有 lint 警告,也要运行功能检查。
实际 Ruff 版本与四条规则保留,不要求全班强制升级到某一版。命令或扩展任选既定路径。
找不到文件先看位置与路径,命令不存在再查解释器和安装。六页参考结束,完整规范和往年练习仍在理论讲义。